Cloudflare 很多朋友都在使用,如果你的网站服务器架设在国外,那 Cloudflare 是一个非常好的加速工具,一可以为你的网站进行加速,二可以给你的网站提供防护,如果你的站经启用了 Cloudflare,遇到 CC 攻击者比较疯狂的扫描的话,Cloudflare 还需要设置一下,才能够精确的判断出攻击者的 IP,然后可以利用脚本分析网站日本,从日志中把攻击 IP 分析出来,再使用 Cloudflare API 将攻击者的 IP 自动的添加到 Cloudflare 防火墙里,当然在遇到大规模的攻击时,可以设置一个定时任务,检测到系统负载非常高时,自动调用 Cloudflare 的 5 秒盾进行防护,下面就给大家分享一下配置教程。

自动屏蔽 IP
首先我们要能找出攻击者的 IP,利用脚本分析日志中在一分钟某个 IP 访问的频率,超过一定的频率(一般来正常的访问,一分钟内应该不超过 60 次,你可以设置为更小),即认定为恶意 IP。脚本如下:
|
1
2
3
4
5
6
7
8
9
10
11
12
13
14
15
16
17
18
19
20
21
22
23
|
#/bin/bash
#日志文件,你需要改成你自己的路径
logfile=/data/wwwlogs/
last_minutes=1
#开始时间 1 分钟之前(这里可以修改,如果要几分钟之内攻击次数多少次,这里可以自定义)
start_time= date +"%Y-%m-%d %H:%M:%S" -d '-1 minutes'
echo $start_time
#结束时间现在
stop_time=`date +"%Y-%m-%d %H:%M:%S"`
echo $stop_time
cur_date="`date +%Y-%m-%d`"
echo $cur_date
#过滤出单位之间内的日志并统计最高 ip 数,请替换为你的日志路径
tac $logfile/sky.ucblog.net_nginx.log | awk -v st="$start_time" -v et="$stop_time" '{t=substr($2,RSTART+14,21);if(t>=st && t<=et) {print $0}}' | awk '{print $1}' | sort | uniq -c | sort -nr > $logfile/log_ip_top10
ip_top=`cat $logfile/log_ip_top10 | head -1 | awk '{print $1}'`
ip=`cat $logfile/log_ip_top10 | awk '{if($1>2)print $2}'`
# 单位时间[1 分钟]内单 ip 访问次数超过 2 次的 ip 记录入 black.txt,这里 wzfou.com 为了测试设置了 2,你需要改成其它的数字
for line in $ip
do
echo $line >> $logfile/black.txt
echo $line
# 这里还可以执行 CF 的 API 来提交数据到 CF 防火墙
done
|
批量增加到防火墙
|
1
2
3
4
5
6
7
8
9
10
11
12
13
14
15
16
17
18
19
20
21
22
23
24
|
#!/bin/bash
# Author: XOO
# Date : 2019
# 填 Cloudflare Email 邮箱
CFEMAIL="admin@771633.com"
# 填 Cloudflare API key
CFAPIKEY="xxxxxxxxxxxxxxxx"
# 填 Cloudflare Zones ID 域名对应的 ID
ZONESID="xxxxxxxxxxxxxxxxxxxx"
# /data/wwwlogs/black.txt 存放恶意攻击的 IP 列表
# IP 一行一个。
IPADDR=$(
# 循环提交 IPs 到 Cloudflare 防火墙黑名单
# 模式(mode)有 block, challenge, whitelist, js_challenge
for IPADDR in ${IPADDR[@]}; do
echo $IPADDR
curl-s-XPOST"https://api.cloudflare.com/client/v4/zones/$ZONESID/firewall/access_rules/rules"
-H"X-Auth-Email: $CFEMAIL"
-H"X-Auth-Key: $CFAPIKEY"
-H"Content-Type: application/json"
--data '{"mode":"block","configuration":{"target":"ip","value":"'$IPADDR'"},"notes":"CC Attatch"}'
done
# 删除 IPs 文件收拾干净
rm -rf /data/wwwlogs/black.txt
|
把以上两个脚本合到一起如下:
|
1
2
3
4
5
6
7
8
9
10
11
12
13
14
15
16
17
18
19
20
21
22
23
24
25
26
27
28
29
30
31
32
33
34
35
36
37
38
39
40
41
42
43
44
|
#/bin/bash
#日志文件,你需要改成你自己的路径
logfile=/data/wwwlogs/
last_minutes=1
#开始时间 1 分钟之前(这里可以修改,如果要几分钟之内攻击次数多少次,这里可以自定义)
start_time= date +"%Y-%m-%d %H:%M:%S" -d '-1 minutes'
echo $start_time
#结束时间现在
stop_time=`date +"%Y-%m-%d %H:%M:%S"`
echo $stop_time
cur_date="`date +%Y-%m-%d`"
echo $cur_date
#过滤出单位之间内的日志并统计最高 ip 数,请替换为你的日志路径
tac $logfile/sky.ucblog.net_nginx.log | awk -v st="$start_time" -v et="$stop_time" '{t=substr($2,RSTART+14,21);if(t>=st && t<=et) {print $0}}' | awk '{print $1}' | sort | uniq -c | sort -nr > $logfile/log_ip_top10
ip_top=`cat $logfile/log_ip_top10 | head -1 | awk '{print $1}'`
ip=`cat $logfile/log_ip_top10 | awk '{if($1>2)print $2}'`
# 单位时间[1 分钟]内单 ip 访问次数超过 2 次的 ip 记录入 black.log,这里为了测试设置 2,你需要改成其它的数字
for line in $ip
do
echo $line >> $logfile/black.txt
echo $line
# 这里还可以执行 CF 的 API 来提交数据到 CF 防火墙
done
# 填 Cloudflare Email 邮箱
CFEMAIL="admin@771633.com"
# 填 Cloudflare API key
CFAPIKEY="xxxxxxxxxxxxxxxxxxxxxxxx"
# 填 Cloudflare Zones ID 域名对应的 ID
ZONESID="xxxxxxxxxxxxxxxxxxxxxxxxxxx"
# /data/wwwlogs/black.txt 存放恶意攻击的 IP 列表
# IP 一行一个。
IPADDR=$(
# 循环提交 IPs 到 Cloudflare 防火墙黑名单
# 模式(mode)有 block, challenge, whitelist, js_challenge
for IPADDR in ${IPADDR[@]}; do
echo $IPADDR
curl-s-XPOST"https://api.cloudflare.com/client/v4/zones/$ZONESID/firewall/access_rules/rules"
-H"X-Auth-Email: $CFEMAIL"
-H"X-Auth-Key: $CFAPIKEY"
-H"Content-Type: application/json"
--data '{"mode":"block","configuration":{"target":"ip","value":"'$IPADDR'"},"notes":"CC Attatch"}'
done
# 删除 IPs 文件收拾干净
rm-rf/data/wwwlogs/black.txt
|
把这个文件存为 SH 文件,直接传到你的服务器里执行就可以,如:
|
1
2
|
chmod +x /root/CF.sh
./CF.sh
|
最后使用定时任务进行执行就可以,宝塔可以在面板里直接设置,如果用 Crontab 可以用以下命令
|
1
|
* * * * * /bin/bash /root/CF.sh > /tmp/ou1t.log 2>&1
|
自动 5 秒盾
代码地址:https://github.com/Machou/Cloudflare-Block
当你的服务器受到攻击时,系统负载就会爆增,利用脚本自动检测系统负载,当压力超过一定的值时就可以切换为” I’m Under Attack! “模式了。操作步骤如下:
|
1
2
3
4
5
6
7
8
9
10
|
#下载
cd /root && git clone https://github.com/Machou/Cloudflare-Block.git DDoS
#打开 Cloudflare.sh,修改配置
API_KEY You're Global API Key (https://dash.cloudflare.com/profile)
MAIL_ACCOUNT Email of your Cloudflare account
DOMAIN Zone ID (https://dash.cloudflare.com/_zone-id_/domain.com)
#设置定时任务
crontab -e
*/1 * * * * /root/DDoS/Cloudflare.sh 0 # check every 1 minute if protection is not enabled
*/20 * * * * /root/DDoS/Cloudflare.sh 1 # check every 20 minutes if protection is enabled
|
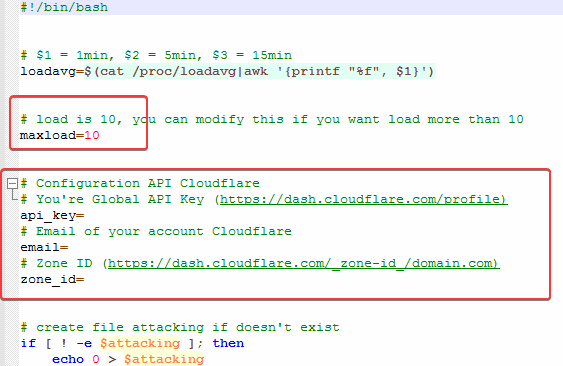
脚本默认的是检测系统负载为 10,启动” I’m Under Attack! “模式,你以根据需要来调整。如下图:

完整代码如下:
|
1
2
3
4
5
6
7
8
9
10
11
12
13
14
15
16
17
18
19
20
21
22
23
24
25
26
27
28
29
30
31
32
33
34
35
36
37
38
39
40
|
#!/bin/bash
# $1 = 1min, $2 = 5min, $3 = 15min
loadavg=$(cat /proc/loadavg|awk '{printf "%f", $1}')
# load is 10, you can modify this if you want load more than 10
maxload=10
# Configuration API Cloudflare
# You're Global API Key (https://dash.cloudflare.com/profile)
api_key=
# Email of your account Cloudflare
email=
# Zone ID (https://dash.cloudflare.com/_zone-id_/domain.com)
zone_id=
# create file attacking if doesn't exist
if [ ! -e $attacking ]; then
echo 0 > $attacking
fi
attacking=./attacking
hasattack=$(cat $attacking)
if [ $(echo "$loadavg > $maxload"|bc) -eq 1 ]; then
if [[ $hasattack = 0 && $1 = 0 ]]; then
# Active protection
echo 1 > $attacking
curl-s-XPATCH"https://api.cloudflare.com/client/v4/zones/$zone_id/settings/security_level"
-H"X-Auth-Email: $email"
-H"X-Auth-Key: $api_key"
-H"Content-Type: application/json"
--data '{"value":"under_attack"}'
fi
else
if [[ $hasattack = 1 && $1 = 1 ]]; then
# Disable Protection
echo 0 > $attacking
curl-s-XPATCH"https://api.cloudflare.com/client/v4/zones/$zone_id/settings/security_level"
-H"X-Auth-Email: $email"
-H"X-Auth-Key: $api_key"
-H"Content-Type: application/json"
--data '{"value":"high"}'
fi
fi
exit 0
|
Cloudflare 是一个非常好的工具,很多功能都可以灵活的进行设置,对于一个小站长,这些防护已经足够了,更多的功能有待于开发。


